Social Marketing Pro: Clickable. bio for Instagram

Social Marketing’s Clickable.bio feature is the easiest way to turn Instagram followers into customers.
Drive traffic by transforming your Instagram Posts into a shippable gallery of your products and services so you can capture more qualified leads, convert leads to customers, and grow your business.
Why is it important?
The main goal of any marketing effort is to generate more revenue for your business. Social media is a cost-effective way of driving traffic to your online store or website to capture more leads, convert them into customers, and ultimately increase your sales.
Instagram has the highest user engagement rate because of its algorithm. In fact, 83% of Instagram users discover new products and services on the platform. However, they can be quickly distracted by other businesses’ posts and content. If you can’t direct your followers to their website in a simple way, they will find a different business to purchase from on Instagram, Google, Amazon, or other marketplaces.
Through Social Marketing Pro’s Clickable.bio feature, you can drive followers directly from your Instagram gallery to your website so these followers can instantly and easily make important transactions, such as purchasing a product, booking an appointment, schedule a tour, or filling out a lead form.
How does it work?
Clickable.bio transforms your Instagram posts into a shoppable gallery of images that turns social fans into paying customers. It is available for free on any Social Marketing Pro account. Just set up your Clickable. bio page in Social Marketing, link your URL in your Instagram bio, and add links to each Instagram post. Below are the detailed steps to help you get started.
Set up a Clickable.bio Page
Make sure your Instagram account is connected to Social Marketing. If you haven’t connected your Instagram account, you can do so through Settings > Connect Accounts. Before you connect it, ensure your Instagram account is connected to a Facebook page.
Go to My Posts > Clickable.bio. Click the Set up button to begin setting up your page in three easy steps.
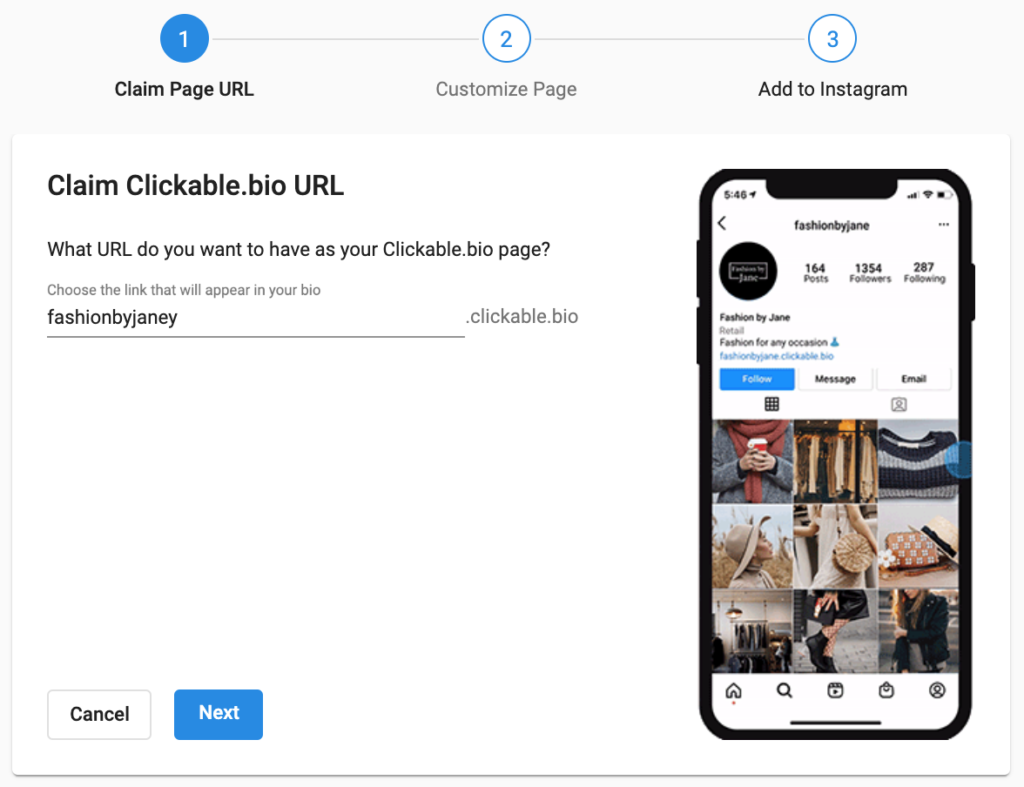
Step 1: Claim Clickable.bio URL
Your Clickable.bio URL is the URL that you will be including in your Instagram bio. This will be pre-populated with the business name attached to your Social Marketing Pro account, but you can change it as long as the URL you want has not yet been claimed by other businesses.
Clickable.bio URLs are formatted as “businessname.clickable.bio” (ex: fashionbyjane.clickable.bio). You can change this URL in the future.
Click Next to proceed.

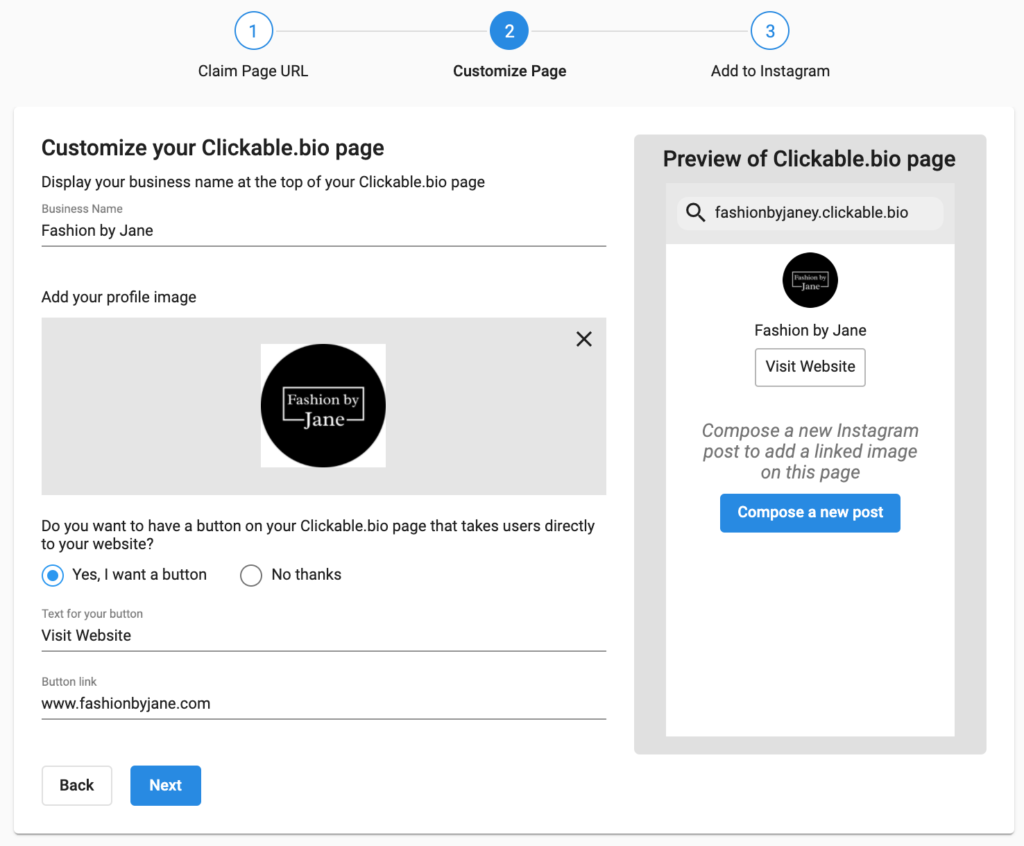
Step 2: Customize your Clickable.bio Page
When users tap on your Clickable.bio link in your bio, it will take them to your Clickable.bio page.
Provide details for each of these fields. As you make changes, you will be able to see a preview of your page on the right side.
- Business name – the name of the business that appears at the top of the page
- Profile image – this shows up above the business name. We recommend using the same profile image as your Instagram account.
- Do you want to have a button on your Clickable.bio page that takes users directly to your website?
- Yes – Type some text for your button – we recommend a call to action like “Visit website” Type in your website’s URL and save the changes.
- No – a button will not appear on your Clickable.bio page
Click Next to proceed.

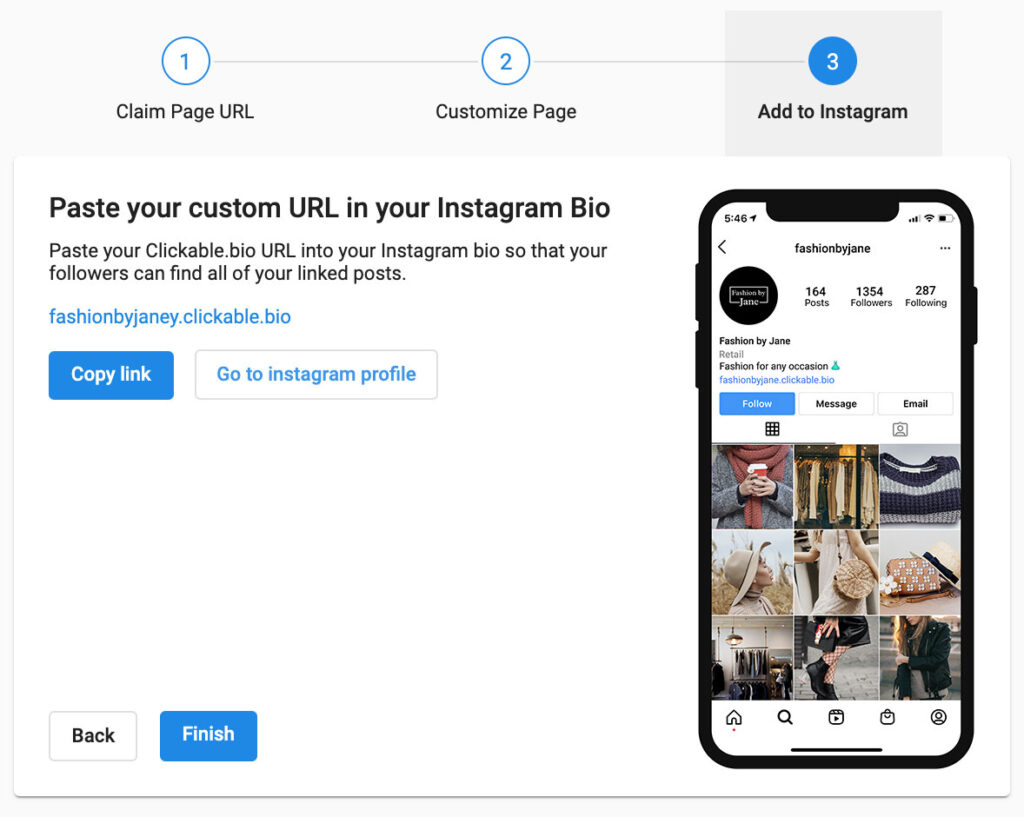
Step 3: Paste your custom URL in your Instagram Bio
- Click the Copy link button to copy your URL.
- Click the Go to Instagram Profile button. This will open Instagram as a new tab on your browser. Make sure you are logged in as your business Instagram account.
- On your Instagram Profile page, click on the Edit Profile button.
- Paste the URL on the Website field.
- Go back to the tab with Social Marketing and click Finish.


Congratulations! You have successfully set up your Clickable.bio page.
Get Insights Of Your Business Profile Performance in Google My Business

A new Google My Business (GMB) performance report feature has been introduced, which can easily check how people find your business online.
It enables you even to track what device and platform people are using to access your local listing. Under the header, you will see how many people viewed your business using a desktop and how many viewed it using mobile. You will also be able to see whether they used Google Search or Google Maps to find you.
Per the updated Help Document from Google:
“A user can be counted a limited number of times if they visit your business profile on multiple devices and platforms such as desktop or mobile ad Google Maps or Google Search. Per breakdown device and platform, a user can only be counted once a day. Multiple day visits are not counted.“
Google went on to say that this metric includes the number of users, which can be lower than the number of views you see on GMB and email notifications.
Google warns that since the metric focuses on views of the business profile and not the overall views of the business on Google, it may also be lower than the number of views you see on GMB and email notifications.
What You Can Do
Go through the relevant support documents to find more details about the report feature.
Core Web and Mobile Vitals Across Industries Like Education, Finance, B2B2, and Retail

A recent study came up with a report comparing “four distinct markets with different websites that dominate their categories.”
The four markets are”:
- Finance
- Business To Business (B2B)
- Educational
- Retail
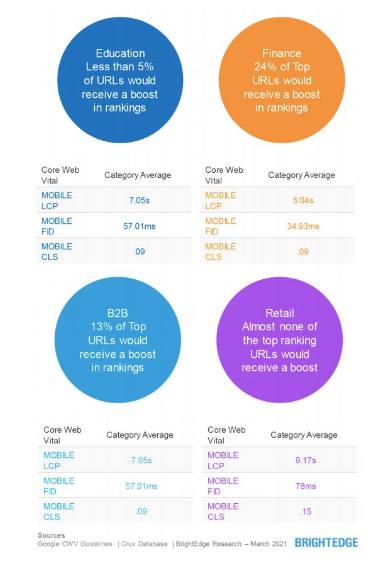
The graphic below will appeal to you the effect that Google’s Page Experience update has on rankings on each market as a whole.

The report suggests that around a quarter of the top finance sites are prepared to receive a boost. While about 13% of the B2B sites would benefit, less than 5% of educational sites and almost none of the retail sites would enjoy ranking if Google flipped the switch.
It was found that the difference between the industries’ expected results was primarily due to the nature of the typical website features normally found on sites within each market. For example, the finance sector features sites that are often informational and competitive in search engine optimization. While on the other hand, education and retail sites are more media and image-orientated – features that are more challenging to optimize for speed, thereby reducing Core Web Vitals Performance.
Here are the key findings:
- The Mobile Experience is critical for all categories.
- Image compression seems to be a leading challenge for the best of brands.
- Pages doing well for CWV tend to be informational in nature.
- Retail, in particular, could see significant disruption if second-tier retailers receive a boost.
The report concludes that you should focus on:
- Reducing your Largest Contentful Paint (LCP) reduces user bounce rates. Reducing First Contentful Paint can improve conversions by as much as 15%. Your audience has other things they want to do, and you should respect their time.
- Improving Cumulative Layout Shift (CLS) provides your audience a visually stable and engaging experience. Layout shift disrupts the user experience and annoys your audience. Annoyed users don’t convert well.
- Improving First Input Delay (FID) helps a website respond quickly to the actions your audience takes. The quicker your website responds to a user’s actions, the crisper their experience is. Users are less likely to return to a website that they feel is poorly designed or broken.
Tips To Get Your Products Listed in Search

Do you have an e-commerce website? This article is a must-read for you! The tips listed here are designed to help you get more traffic to your website.
How does Google list your products on its search page?
- Google aims to help users make the right decision, and it does so by using special formatting for products. For example, Google shows product details like ratings, reviews, prices, etc.
- Google also displays product images with additional details like ‘in stock.’
- The tools in Google Shopping Tab help users filter products depending on the price range, brand, etc.
- If you have provided the location of your inventor, Google Maps can also display your products when a user enters a specific location.
Importance of providing product data to Google:
- Product data is more accurate and precise than the data fetched from website pages.
- When the data you provide is accurate, Google can confidently filter your products according to the user requirements.
- As we all know, structured data is preferred by Google to understand your product details better. One of the common ways to encode structured data on a page is by using JSON-LD-encoded content.
- Participating in Google Shopping Tab is FREE, and product data from Google Merchant Center can be displayed in organic search results. So, here is your chance to submit your data to Google Merchant Center and drive more customers.
Three strategies to get your product data into Google Merchant Center
01: Google’s Web Crawling
- You can set up and configure Google Merchant Center and let Google crawl product data from your website. Make appropriate approvals in your Google Merchant Center account to get listed in Google’s Shopping tab.
- You can also use supplemental feeds to add additional fields to the primary data. Additional feeds include stock level, pricing, etc. Google combines your primary data with supplemental fields to form a final view or table of your product. Supplemental feeds can be updated more frequently. Different ways to provide supplemental fields include Google Sheets, scheduled uploads, and on-demand uploads.
02: Periodic Feeds
- In this strategy, you submit your entire catalog file to Google. Google then compares your feed data to original data and checks for data consistency. If your data is highly inconsistent, your product can be removed.
- To keep Google Merchant Center updated with your current web page data, enable automatic item updates in your account.
03: Content API
- It is tedious to replace a complete set of data related to your products. To make it easier, you can use API to insert, remove, or update specific products. The best part here is you can make changes to a single product as well as a small group of products.
Get Started!
- Use structured data to improve accuracy.
- Make a proper plan to send your product data to Google (for ex: API, Google Sheets, etc.).
- Add attractive and engaging content, especially images, descriptions, etc. related to your products.
Tips To Optimize Your Videos

Whether you upload videos related to education, sports, or any other field, it is important that Google finds your videos and displays them to users. This article gives you some basic details on how Google indexes videos and the best practices for optimizing your videos.
How Google Identifies a Video
- Google checks for various signals to identify videos. These signals are video HTML tags, structured data markup, video sitemaps, and many more.
- After identifying a video, Google tries to understand its content to display relevant videos to users.
- To understand the content of a video, Google looks for available text on the video page. Various texts like the page title, heading, captions, referral links (if mentioned), etc., are considered. Google also fetches structured data markup to analyze the audio and video content.
Locations where your videos can appear if optimized correctly
- Google’s main search results page
- Google’s Video search tab
- Google’s Image search tab
- Google Discover Suggestions
Best Video Optimization Practices To Follow
- Make your videos available publicly. Do not block your page by using robots.txt.
- Use appropriate HTML tags to organize your content properly & make it easy for Google to understand.
- Use a specific and unique title and description for each video.
- Each video must have a single, unique, and stable URL.
- Use VideoObject markup to include details of your videos like duration, thumbnail, descriptions, etc.
- Videos must include a high-quality thumbnail image. Either you provide one or let Google generate a thumbnail for you. For more information about supported image formats, click here.
- For live streaming videos, display the “LIVE” badge on your video. Use BroadcastEvent structured data and the Indexing API to make the badge visible.
- Even if the videos embedded on your page use platforms like YouTube, Vimeo, or Facebook, you must provide structured data & make sure that these hosts permit Google to access your video file.
- You can also restrict your video based on the users’ location. If you use VideoObject structured data, then follow those steps.
Benefits of allowing Google to fetch your files
- Google selects a preview of your video to make it more engaging. To set the duration of the video preview, use the max-video preview robots meta tag.
- Google can also automatically detect key moments (video segments) in your videos. These are two ways to inform Google manually about the key moments.
- If your video is embedded on your web page – add Clip structured data
- If your video is on YouTube, check out these points.


0 Comments